* This feature requires the professional edition. ![]()
Word-2-CHM Pro can create help Id (context id, topic id, etc.) and help Id definition file automatically. A unique and persistent help Id will be created for each help topic while the “Auto Help Id” option is checked.
Steps
for creating help Ids:
1. Check the “Auto Help Id” option.
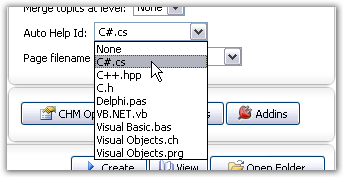
2. Select a help Id definition template from the drop-down list.
3. Click the “Save” button to save to a .word2chm project file.
4. Create the CHM file.
After
the CHM file is created:
1.
A help Id file named “Project Name.helpid.ini”
is saved to the same folder where the “.word2chm” project file is. For example, the help Id file will be named
“help1.helpid.ini” if the project is named “help1.word2chm”.
DO NOT DELETE THIS FILE!
The file contains the help Ids of every help topic. Word-2-CHM uses it to keep the
help Ids persisted. Of course, you can modify the help Ids in this file manual
as you wish.
2. A help id definition file is saved to the same folder as the created CHM file. The filename of the definition file is same as the CHM file, and the extension of the file is same as the template you selected. For instance, the CHM is named “help1.chm” and the selected template is “C#.cs”, the definition file will be named “help1.cs”. The definition file will be recreated every time you recreate the CHM file. You should add the definition file to your program to use it.
Note:
There are several predefined help Id
definition templates in the sub-folder “Templates.HelpId” of the installation
folder of Word-2-CHM Pro. The most common, the folder is “C:\Program
Files\Macrobject\Word-2-CHM 2009\Templates.HelpId”. You can create you own template file and
put it in this folder or modify the existing templates.
Help
Id definition template for your programming language not defined? Please contact us at [email protected].
Related Topics